Saturday, May 24, 2014

Strawberry cup cake

Strawberry season starts here, and we get lots of fresh strawberry in stores and we can directly go to the farms and pick it. Last year we had a strawberry picking and enjoyed a lot. Eagerly waiting to visit the farm again this year. My daughter loves strawberry and I often used to get this fruit for her.


Last time when I got strawberry i thought of making some cakes with it, and ended up making these delicious cup cakes.

Ingredients:

Strawberries - 4-5 large (the puree should be 1/3 cups)
Strawberries - 1-2 large cut them into small pieces
APF - 1 and 2/3 cups &1 tbsp
Butter - 1/2 cup
Baking powder - 1/2 tsp
Baking Soda - 1/4 tsp
sugar- 1 cup
milk- 3/4 cup
egg - 1
yogurt/curd- 1/4 cup
vanilla extract - 1 tsp


Preparation:
1. Preheat oven to 345F and line the cupcake mold with the liners.
2. In a blender add the cut strawberries and give a quick pulse and make it as puree (preferably chunky puree)
3. Cut the remaining strawberries and keep aside
4. Sieve flour, baking powder, baking soda,  and keep aside.
5. In a pan melt the butter, transfer to the mixing bowl, add sugar and mix well
6. then add, milk, yogurt,vanilla extract and mix well
7.Now add the sieved flour mix and mix.
8. Add the Strawberry puree and give a quick mix.
9. At last add the cut strawberry pieces to it. and mix gently
10. Pour them into the cupcake liners and bake for 20-25 minutes
11. Check with toothpick whether it is done or not. if the toothpick comes out clean, then remove from oven and cool then in cooling rack.


Notes:
Instead of making puree, you can just cut them into small pieces and add.
The given quantity makes about 15-18 cup cakes.


sending this recipe to Rafee's baking fest event  Bake fest May 2014

Thursday, May 22, 2014

Radish Chutney

Hey Folks, Sorry for disappearing suddenly for a long time. I was damn busy in the past weeks with my shopping and packing for my dream trip to New York. We had awesome family time after months. Still in the vacation mood by checking the pics, uploading it and sharing with family and friends.. :)

I knew i will not be in a mood to cook anything as i will be very tired after the trip, i have prepared the idly dosa batter before going for trip. With the plan of making some simple yet healthy chutneys. I have stocked veggies like, pumpkin, radish, carrot, bell peppers kind of veggies, so i can make some healthy chutney to dip with idly or dosa. Today I am sharing the radish chutney recipe , pumpkin and carrot chutneys are on the way. :)))


 About Radish, they are one of the healthiest veggies with lot of goodness in it. Most recommended for the people with the kidney stone problems. I always prefer adding this veggie at least once a week.

Ingredients:

Radish - 1 medium size, remove skin and slice(sliced radish about 3/4 cup)
onion - 1/2 (chopped)
tomato -1 medium (chopped)
ginger - a small piece
garlic - 2-3 cloves
tamarind - a gooseberry sized
channa dal - 1 tbsp
urad dal -1 tbsp
oil - 2 tea spoon
red chilies- 2 (you can add more if you like spicy chutney)
salt- as per taste

to temper
Oil - 2-3 tsp
mustard seeds - 1/2 tsp
urad dal - 1 tsp
perungayam - a pinch
jeera - 1/2 tea spoon


Preparation:
1.  In a pan heat 2 tsp of oil and roast the channa dal and urad dal in medium heat
2. When they start changing to light brown color, add tamarind,red chilies, ginger and garlic to it and saute well.
3. now add the cut onions and saute until they are transparent.
4. Then add the sliced radish to it and saute until they are soft.
5. Atlast add the tomatoes and saute well for 2 minutes.
6.Let it cool down, then grind it in blender or mixie
7.temper it and serve with idly or dosa.


Notes:

1. If you are adding tamarind concentrate add it at last before switching off the stove.
2.any radish can be used,  either red or white
3. cut the radish into thin slices, which will be cooked quickly.


Monday, May 12, 2014

Nan Khatai /சூஸ்பரி

Happy Mothers Day to all the mothers around the world :)))

Hope everyone had a great mothers day. I really had a great one this year... My daughter gifted me a flower vase which she made from school. And she herself drew, cut and colored a heart for me. And I got loads of kisses from her through out the day :))) She made a pretend cake and snacks, we both cut the cake and shared the snacks and played some pretend games. When it was my turn  to be a baby and my daughter to be the mom, She asked me, "Sweetie!, what gift you are going to give me for Mother's day?" I was blinking what to answer, and she dint put me in trouble, she came up with a suggestion as "Mamma will be happy if you give a tight hug and a sweet kiss". So sweet mom (though pretend!) she was.


Now about the recipe, As mothers day special, I have prepared Nan Khatai / சூஸ்பரி which is my mom's favorite snack from her childhood. She never used to be particular about her favorite things. But these nan khatais are exceptional. The one we get in our native used to be very soft and used to melt in our mouth. And my mom loves these a lot.


So I have made these as Mothers day special recipe.

The Nan Khatai which i made this time were little crispy and the taste was awesome. It was liked by my family and friends also.

Recipe inspired from here

Ingredients:

All purpose flour - 1 cup
confectioner sugar - 1/2 cup
Butter - 1/2 cup (at room temperature)
baking powder - 1/2 tea spoon
salt - 1/8 tea spoon
nutmeg powder - 1/2 tea spoon
elachi powder - 1/2 tea spoon

Preparation:

1. In a mixing bowl beat butter well
2.Now add sugar and beat well to a smooth paste
3. Sieve flour, salt and baking powder
4.Add elachi powder, nutmeg powder then mix it to the smooth paste
5. Now add the flour mix little by little with the butter paste and mix well.
6. Once all the ingredients are mixed, knead the dough with hands, cover with a plastic wrapper or cover the bowl with a lid, and let it rest for 20 minutes.
7. After 20 minutes again knead the dough again and make small balls out of it.
8. In the mean time, pre-heat the oven to 300F and line the cookie sheet.
9. Then, arrange the balls with some gap between each and bake for 20-25 minutes in middle rack.
10.cool them in cooling rack and store it in airtight container.

Notes:
1.Given quantity of ingredients made about 12 medium sized cookies.
2. It took 23 minutes for me to bake in my oven.
3. If you are using salted butter, avoid adding salt in the cookies.
4. Just make the balls without crack so the cookies will be smooth and perfect in doom shape without any cracks in it.
5.Do not over bake, the cookies will turn hard and the bottom of the cookie will burn and the taste will get change.
6.When you remove from oven the cookies will look like soft, once they are cool down, it will be perfect crisp.


sending this recipe to Rafee's baking fest event  Bake fest May 2014

Monday, May 5, 2014

Chili Paneer

I have recently tasted Chili paneer recipe in a restaurant here. Its taste was awesome, As it was little spicy for my daughter, she did not eat properly. But I was damn sure, she might like it if it is less spicy. So when I was thinking whether to make paneer masala or chili paneer, I decided to prepare chili paneer itself. As expected, she liked it very much. :)))

In no time the dish was ready. you may like to make it for potlucks and parties also. total time taken to prepare this yummy dish was less than 20 minutes only. if you thaw the paneer using microwave, it will take just few mins for it. If you do not use microwave, just remove from freezer and keep it in room temperature for an hour, it will be ready to use.

Ingredients: 

Paneer - 200 grams 
All purpose flour - 2 tbsp
corn flour - 2 tbsp
salt- a pinch
Onion - broadly cubed layers - 1/4 cup
Onion- 1-2 tbsp (finely chopped) 
Spring onion - 1-2 tbsp(finely chopped )White part
Spring onion - 1-2 tbsp green part, finely chopped
Garlic - 1-2 cloves (finely chopped)
Capsicum / bell pepper - 1/3 cup broadly chopped
Tomato sauce - 2 tbsp
green/red chili sauce-2 tbsp
soy sauce - 1/2 tea spoon
lemon juice - 1 tea spoon
Oil - to fry paneer cubes + 1 table spoon to saute veggies

Preparation: 
1.Thaw Paneer and keep ready to use.
2. mix all purpose and corn flour and a pinch of salt with little water with a thick consistency, enough to coat the paneer cubes. (if it becomes watery, the mix will not stay in the paneer.) Keep it aside for 5 minutes
3. In a pan or kadai, heat a table spoon of oil, and add the garlic, spring onions white part, finely chopped onions one by one and saute well for a minute.
4. Now add the broadly cut onion pieces and saute until they are transparent
5.Then add the capsicum cubes and saute well
6. In the mean time, in a kadai, heat enough oil to deep fry the paneer cubes. 
7.coat the paneer well in the flour mix, and fry until they are golden brown. Remove from oil and drain in the kitchen towel / tissue.
8. Now add the sauces to the onion capsicum pan and saute in medium flame.
9. Add the fried paneer cubes when they are hot itself.
10. check and adjust the salt. add a tea spoon of lemon juice,Mix well and garnish with the spring onion greens.


Lunch Menu

Dont miss to check the Corn Pulao Recipe

Sunday, May 4, 2014

Corn Pulao / Sweet Corn Pulao

How was the weekend Friends? I really had a great weekend with loads of shopping and food :))) This weekend special at our home was Corn Pulao and Chili Paneer.


I was not having proper vegetables in the refrigerator today to make anything special. When I searched in the freezer section, I found a pack of paneer and sweet corn which i got a week back. I have bought the corn pack especially to make the pulao and to try some snacks for my daughter. So thought of making it today.And it turned out very well and the family enjoyed it. Here is the recipe.


Ingredients:

Basmati Rice - 1 and 1/2 cups (wash and soak for at least 30 minutes)
Corn - 3/4 cup
Onion - 1 small or 1/2 of big (sliced)
Green chili - 2-3
Mint leaves - a few
salt- as per taste
water - 2.75 cups (the basmati i used require 1:1.75 water to cook, so adjust according to the rice you used)
Oil - 2 table spoon
ghee- 1 table spoon (optional)
Bay leaves -1

To grind:
Ginger - 1 inch piece
Garlic - 3-4 cloves
cinnamon stick - a small piece
cashews - 8-10
pepper - 4-5 nos
cloves-2

In a blender, add all these mentioned ingredients and grind as a fine paste by adding required amount of water.


 Preparation:

1. In a pressure pan / cooker heat 2 table spoon of oil, then add bay leaves and silted green chili
2. Add the sliced onions and saute until they turn transparent.
3. In the mean time, prepare the paste of items mentioned in the section "to grind" and add, then saute them well until the raw smell leaves..
4. Then add the corn kernels, and saute for a minute or two
5. Now add the soaked rice, water, salt,mint leaves and close with the lid
6. keep the flame on the simmer and cook for a whistle.
7. Once the pressure is released, mix gently with a fork and serve with your favorite side dish.


We enjoyed the pulao with Chilli paneer.

Notes:
1. Pulao normally cooked with milk/coconut milk for its richness. Today I have not added, since i didn't have any of those. :)I personally prefer coconut milk for pulao. If you do not have health constrains, do not miss adding coconut milk.
2. While adding milk/coconut milk adjust the water quantity accordingly.
3.Garnish with coriander leaves if you like.


Dont miss to check the Chili paneer Recipe also

Saturday, May 3, 2014

Pallipalayam Chicken / பள்ளிப்பாளையம் சிக்கன்

I have heard about this dish but never tasted before. As I heard it is a spicy chicken, I usually avoid ordering it in restaurants. Recently I have come across this recipe and the pics in G+, and thought of giving a try. And the things behind this dish which driven  me to try was the very limited ingredients and the mentioned  interesting history behind this dish.


Pallipalayam is a small town in Namakkal District. Seems there were more people who were doing the carpenter jobs, and they had to travel to the neighbor places/towns for their job all the time. During those travels, they cannot carry more ingredients with them for cooking.As well as they cannot spend much time also for cooking. Hence they invented this interesting recipe with limited ingredients which stay good for long time in room temperature itself. Hence it has got the name as Pallipalayam Chicken.


Interested to know the ingredients?
Chicken - 1 lb cut it into small pieces(i used boneless)
Onion - 2 large sized (sliced)
Garlic - 1 bulb (peel the skin and chop into small pieces)
Red chilies- 2-3 (you can use according to your spice level, I have used the deseed red chilies 2 nos)
salt - as per taste
Oil - 2 table spoon
coconut pieces - one fist

Preparation:

1. Heat kadai/ pan with 2 table spoon of oil, and saute the sliced onions until they are golden brown.
2. Then add the chopped garlic, and the red chilies and saute until they are cooked and turns light brown.
3. Add the chicken and salt,then saute along with the onion mix.
4. Close with a lid and stir every 10 minutes to avoid burning.
5. Chicken itself leaves some water so no need to add water to cook.
6.Approximately in 30 minutes, all the water will be evaporated and the chicken would be cooked well.
7. Now add the small coconut pieces in it and stir for few mins and switch off the flame.

A tasty chicken dish is ready to enjoy. My daughter loved it with steamed rice.

Note:
1. Spice level can be increased as per your taste. In the original recipe, for 1kg of chicken 10nos of red chilies were used(with seeds).
2. The recipe and the history inspired from one of my G+ friend.


It was our sunday special lunch.. Dont miss to check the other sunday/week end special recipes below:

Veg Fried Rice
Egg Fried Rice
Egg curry

sending this recipe to Remya's Event


Thursday, May 1, 2014

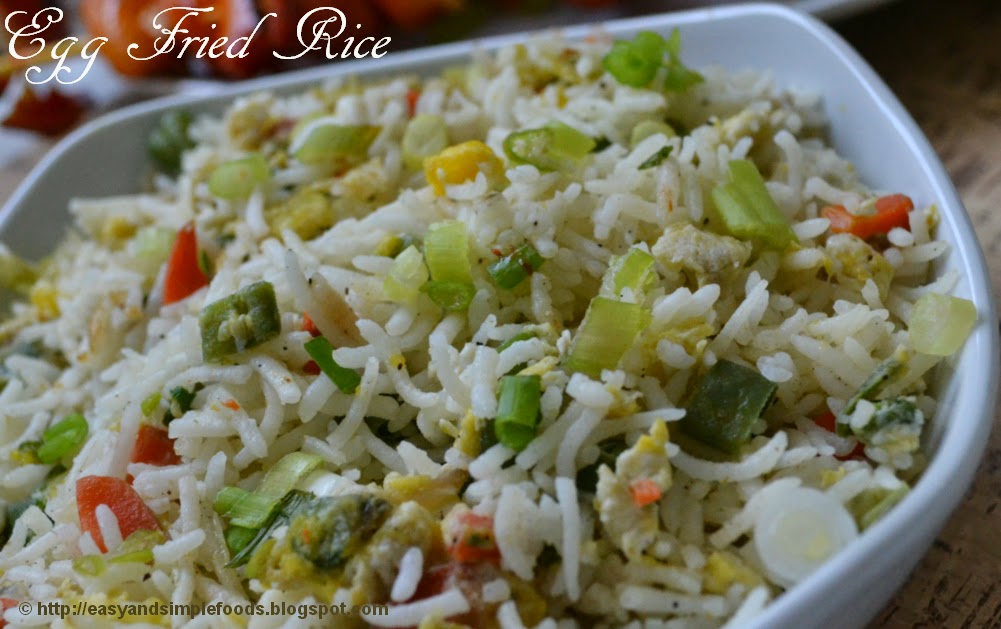
Egg Fried Rice

Last month I have prepared more dishes and tried few bakes also, Since the schedule was bit tight, could not post much. So planning to post all the recipes in draft first :)) i could not participate in any events also last month, this month will try to spend time blogging again :))

I have recently shared the Veg Fried Rice recipe, Few of my friends tried it and I have received a good feedback too (Yipeeeeee :))))). Today I am going to share Egg fried Rice recipe which is almost similar to Veg Fried rice, only adding the eggs are included in it.


Ingredients:

basmati rice (cooked) - 2cups
Veggies - 2 cups (carrot,beans, green peas combined, carrot beans finely chopped)
Onion - 2 table spoon (finely chopped)
Garlic - 1 table spoon (finely chopped)
Spring Onion (White part) - 1 table spoon
Spring Onion  (green part) - 2 table spoon
soy sause - 1/2 tea spoon
Green chili sauce - 1-2 tea spoon
Pepper powder - 1 tea spoon
salt - as per taste
Oil -4 to 5 Tea spoons
Eggs- 3-4


Preparation
1. Soak Basmati rice for minimum of 30 mins, cook it fluffy, sprinkle a tea spoon of oil and keep aside.
2. In a Pan or Kadai, heat 3 tea spoons of oil, once heated, add the garlic, onion and spring onion white part.
3. Once the raw smell leaves, add finely chopped beans first and saute, after two minutes add the remaining vegetables and a pinch of salt then saute well.
4. Close the lid and simmer the flame, let the veggies cook well.
5. Once the veggies are cooked, add One Egg to it and saute for a minute.
6.In another pan, drizzle few drops of oil and make scrambled eggs (just add a small pinch of salt and pepper powder)with the remaining eggs.
7. Once the veggies and egg is cooked along, add the cooked rice, and scrambled eggs to it and mix gently.
8. When the veggies and rice are mixed, add the soy sauce, green chili sauce and mix.
9. Adjust the salt accordingly. Then add pepper powder to rice and mix well.
10.Garnish with finely chopped Spring onions green and serve with tomato chili sauce or your favorite side dish.


This time I have just prepared few chicken dishes on the same day. Chicken Tikka, Baked chicken Legs and Pallipalayam Chicken.

I have enjoyed the Egg Fried Rice with Chicken Tikka and tomato chili sauce. Just clicked all together;), So the other recipes are on the way :)))

Notes:
1.Adding green chili sauce is optional, if you are adding, adjust the pepper quantity accordingly.
2.I prefer adding a egg with cooked veggie and then adding the remaining as scrambled. It s\is up to you, how you prefer to add.
3. Do not skip adding the spring onions